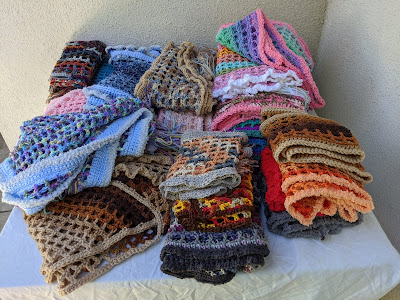
Piles of Color: Scarves Stacked, Shawls Disheveled
There are 23 scarves and shawls in this colorful pile. I've crocheted them all in the last four months, loving every minute of quiet time, enjoying every stitch. Some of them are plain and simple, others have a bit of bling. These are going to be given as Christmas gifts to friends and family.
There are interesting textures and details in each one, worth looking at more closely. I enjoy photographing the intricacies of crochet layers. For images of texture, detail, and crazy color combinations 😍 you can click through the various pages: Color Buffet, Color Blast, Color Revel, Blue Jean Baby, Pretty Pink, Earth Tones
I'm happy to share this, and delighted that you're taking a look! Here is another view, less piled, more posed. 😁
Mom taught me to crochet, 42 years ago! Just the basics, and that was enough. From starting chain, to finished edge, and possible ruffle, maybe some fringe, I just try to keep it simple. 😎 And I do like to make it colorful. I love the texture of crochet mesh, which is the basic form of these scarves and shawls. The final product is either a super long rectangle (scarf) or a really big triangle (shawl). And they are all the same easy pattern: I make a starting chain, and then keep going, back and forth, row by row, until I think it looks done. And I reserve the right to change my mind at any time, without logic or explanation. To go back a week later and add a ruffle.
Perhaps some day I will venture out into more complex patterns, something more sophisticated, not a basic geometry. 😁 But right now I'm enjoying this process so much, I might just make another 23 projects exactly like this.
Love you, Mom. Miss you, Mom.
 |
| More posing of piles. |
Here is my process:
(1) Starting chain, as long as you like.
(2) First row is a mesh pattern of dc, chain 2, dc, chain 2, all the way to the end of the row.
(3) Turn and either (a) repeat dc, chain 2, dc, chain 2 (for a more loose texture) to the end of the row, or (b) sc all along the top of the row (for a more firm texture) and turn to dc, chain 2, dc, chain 2 to the end of the row.
(4) Repeat for as many rows as you like. Just a few rows can make an interesting necklace-like summer accessory, very classy. A whole bunch of rows can eventually become a summer evening blanket, so airy.
(5) Finish the edges with sc around the entire border. Go around twice, or more, for a deeper finished look, and change colors if you really want to stylize it. You can also leave the edges unfinished, for a more free spirited look.
(6) Optional, add a ruffle to one or two sides, for an old fashioned look. It feels like a cozy collar.
(7) Optional, add fringes for colorful flair. A whole other design process unto itself, fringe is extra work, and slow going, but always worth it, a very fun look in the end.
 |
| Ruffled edge, Finished edge, and Fringe |
There are many, many blogs, web sites, and video channels that have tutorials and basics on getting started with crochet. I had my Mom to get me started, but nowadays I do appreciate the internet to help me learn a few new tricks. I also love a good old fashioned book, to show me what I should be learning.😁 Here is what I have on my desk right now:


Comments
Post a Comment